If you spend any time in a gym or around runners, cyclists, or anyone tracking their fitness on a watch, you'll hear people talk about zones. Zone 2. Zone 4. The grey zone. HIIT. Polarised training. Most of the time, the people using these terms have a rough idea of what they mean, but the way they actually train doesn't line up with the science behind them.
The research on training intensity has matured significantly in the last ten years. And the picture it paints is fairly clear: most people are working harder than they need to on their easy days, and not hard enough on their hard days. Everything ends up bunched in the middle, a place that feels productive but quietly gives you the worst of both worlds. Let's unpack why, and what to do instead.
What "training zones" actually means
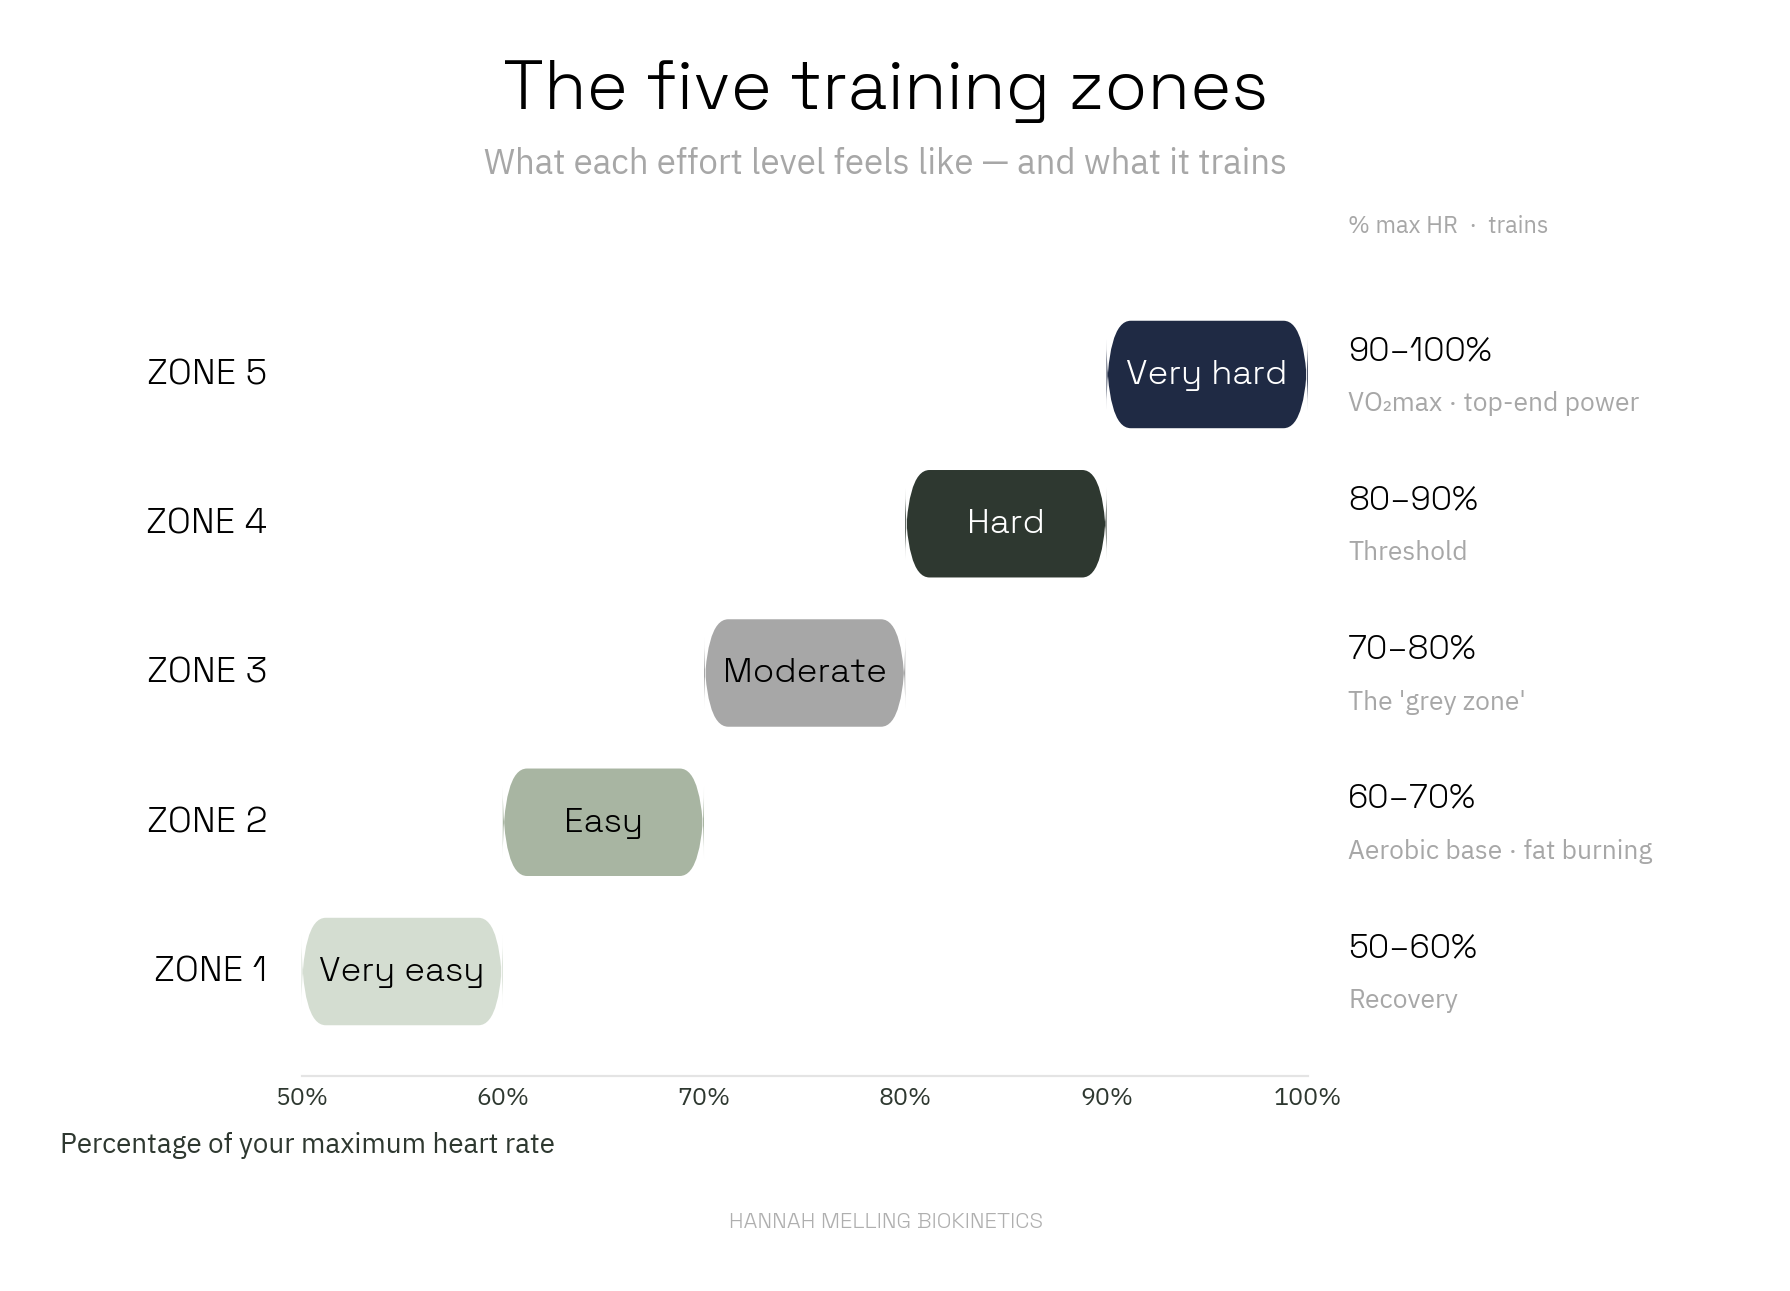
Training zones are just a way of dividing effort into bands, usually based on heart rate, pace, or power. The five-zone model is the most common:
- Zone 1: very easy. Recovery pace. You could do this all day.
- Zone 2: easy, conversational. You can hold a full sentence. This is the aerobic base zone.
- Zone 3: moderate. "Comfortably hard." Talking gets clipped. This is the famous grey zone.
- Zone 4: hard. Threshold effort. You can manage a word or two, not a sentence.
- Zone 5: very hard. Near-maximal. All-out intervals.
The important thing isn't the labels; it's that each zone drives a different physiological adaptation. Train in the wrong one for your goal, and you spend energy without getting the benefit you were after.
At the low end, easy aerobic work builds mitochondria, the little engines inside your muscle cells that turn fuel into energy. The more you have, and the better they work, the more efficiently you produce energy and clear fatigue. Zone 2 specifically sits just below your first lactate threshold (LT1), around 1.5–2.0 mmol/L of blood lactate, and this is where mitochondrial biogenesis is most strongly stimulated (Coates et al., 2023).
Easy training builds more and better "engines" in your muscles, so your body makes energy more efficiently.
At the high end, hard intervals do something different: they push your cardiovascular system to its ceiling, improving stroke volume, cardiac output, and ultimately your VO₂max, the maximum amount of oxygen your body can use. That ceiling is one of the strongest predictors of both performance and long-term health (MacInnis & Gibala, 2017).
Hard intervals lift the size of your engine's ceiling: the more oxygen you can use, the fitter and healthier you tend to be.
The middle (Zone 3) improves your ability to buffer and clear lactate at tempo effort. Useful in the right dose. The problem is how often it becomes the default dose.
The big finding of the last decade: train polarised
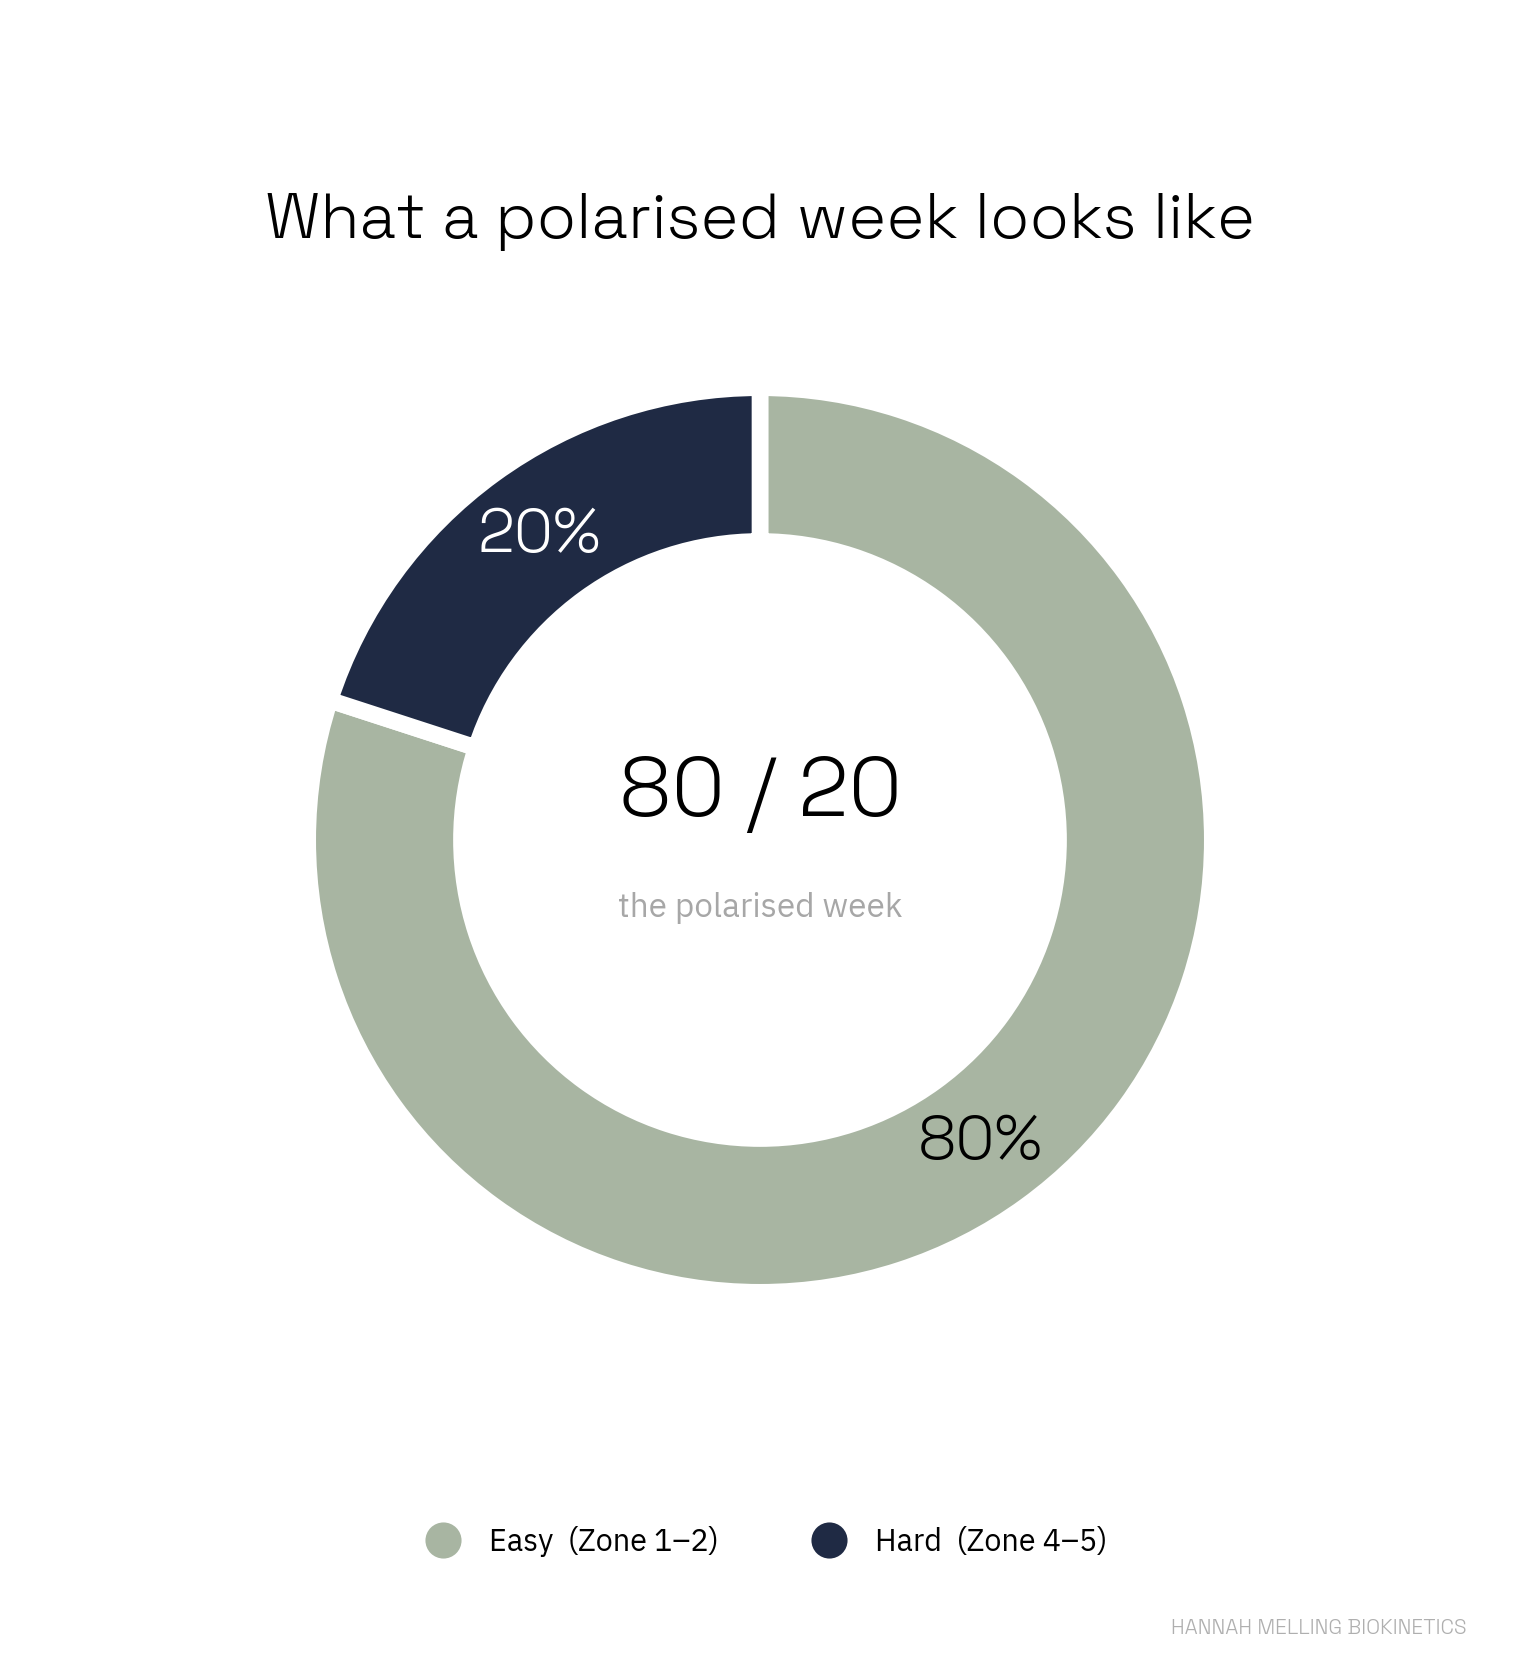
If there's one idea that has reshaped endurance training in the last ten years, it's polarised training: the observation that the most effective athletes spend roughly 75–80% of their training at low intensity and 15–20% at high intensity, with very little in the middle. It's often shorthanded as the 80/20 rule.
This isn't a fad. It has held up across multiple systematic reviews and disciplines. A 2024 analysis by Nøst, Aune and van den Tillaar pooled 14 studies and concluded that a distribution of about 75–80% low plus 15–20% high produced the best gains in VO₂max and work economy. A direct head-to-head by Rosenblat, Perrotta and Vicenzino (2019) found polarised training outperformed threshold-based training. And broader comparisons of polarised, pyramidal, threshold and block models have consistently placed polarised at or near the top across endurance sports (Stöggl & Sperlich; Filipas et al., 2024).
The best results come from going easy most of the time and hard some of the time, not moderate all the time.
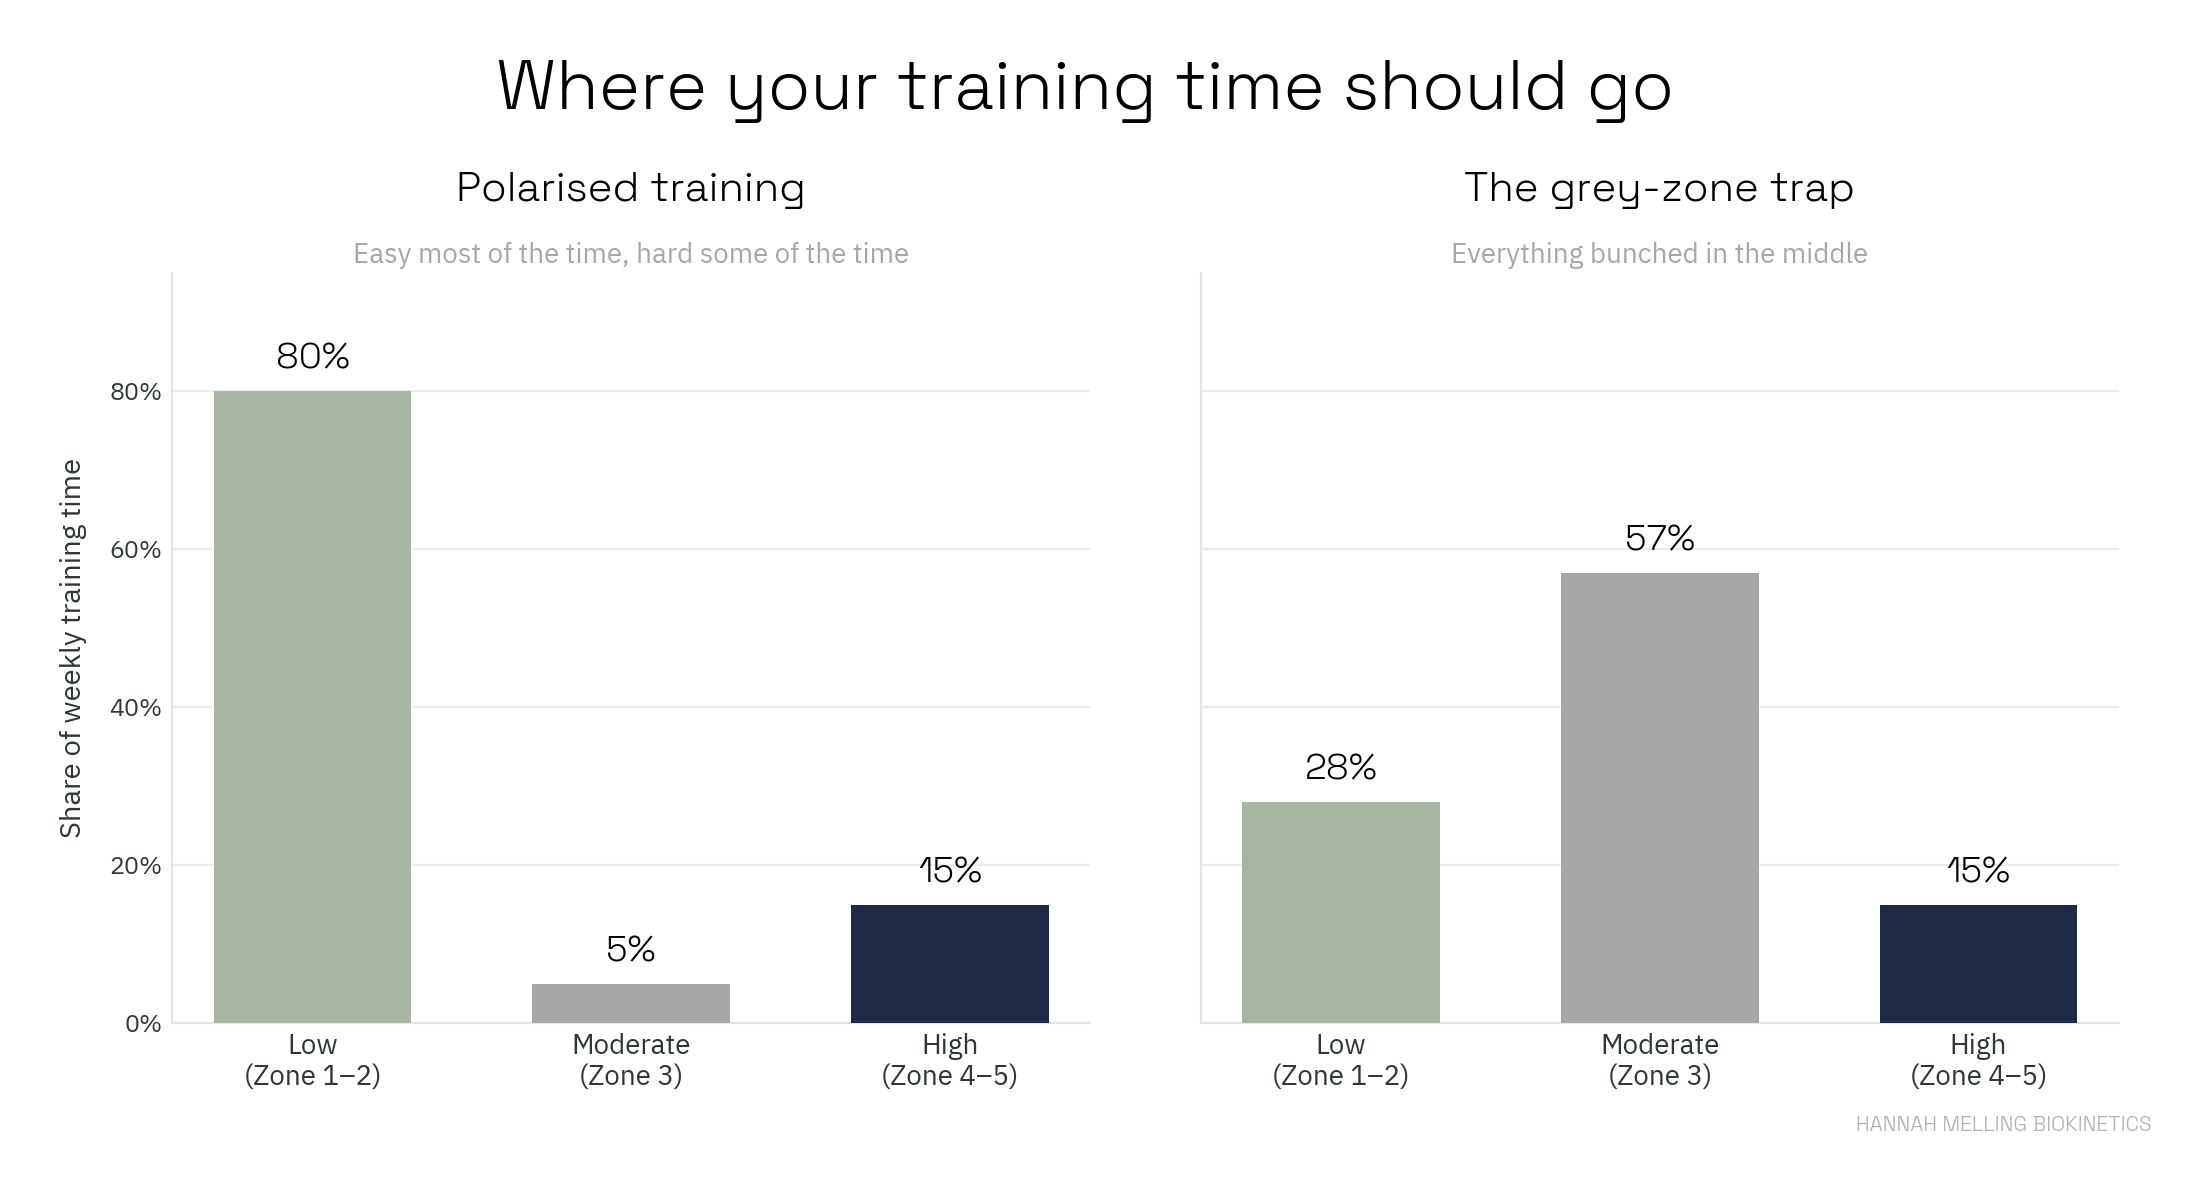
The logic is elegant. Easy work gives you a big base of aerobic adaptation without much fatigue cost, so you can do a lot of it. Hard work gives you the high-end stimulus that actually raises your ceiling. And crucially, keeping the two apart means your easy days stay easy enough to recover from, which lets your hard days be genuinely hard. Bunch everything in the middle and you get neither: too taxing to recover from, not intense enough to drive top-end change.
What each zone is for, and when to use it
Zone 2, your aerobic base. This should be the bulk of your training. It builds mitochondrial density, improves fat oxidation, and strengthens the aerobic engine everything else sits on top of. The mistake most people make is running it too fast. If you can't hold a conversation, you've drifted out of it. Bishop et al. (2024) confirmed the specific mitochondrial and clinical adaptations that come from consistent moderate-intensity aerobic work. Use it for long, easy sessions, most of your week.
Slow, steady sessions build the foundation everything else is built on, so keep them slow.
Zone 3, the tempo zone, used sparingly. It has its place, particularly for race-pace familiarity and lactate clearance. But it's the zone people fall into by accident, and it's why "I trained hard all week and didn't improve" is such a common complaint. Use it deliberately, in small doses, not as the setting for every run.
Zone 4–5, your high-intensity work. This is where VO₂max improves, and the evidence here is strong. An umbrella review by Poon et al. (2024) established that high-intensity interval training reliably improves cardiorespiratory fitness, and noted that each 1-MET improvement in fitness is associated with roughly an 11% reduction in all-cause mortality risk. A meta-analysis by Ma et al. (2023) showed HIIT keeps working even in already-fit, elite athletes. Use it as your one or two hard sessions per week, with real recovery between them.
A small amount of genuinely hard work makes you fitter and even lowers your health risks, and it works no matter how fit you already are.
The grey-zone trap
Here's the pattern that catches almost everyone. You go out to train. It feels good to push, so your "easy" run creeps up to moderate. Then on the day you're meant to go hard, you're still carrying fatigue from the last one, so your "hard" session lands at… moderate. Week after week, everything converges on Zone 3.
It feels productive. You're always a bit tired, always a bit sweaty, so it seems like it's working. But you're getting a shallow version of both adaptations instead of a deep version of either. This is the single most common reason recreational athletes plateau, and it's entirely fixable.
How to apply this without a lab
You don't need lactate testing or a fancy watch to get most of the benefit. A few practical anchors:
- Use the talk test. In Zone 2 you can speak a full sentence comfortably. If you can only get a few words out, you're in Zone 3 or above.
- Make your easy days genuinely easy. This is the hardest discipline for motivated people. Slow down more than feels natural. If it feels too easy, you're probably doing it right.
- Make your hard days genuinely hard. One or two sessions a week where you commit to real high-intensity effort, and then recover properly.
- Protect the ratio. Roughly four parts easy to one part hard. Keep the middle for the occasional deliberate tempo session, not the default.
If you're returning from injury, managing a health condition, or on medication that blunts heart rate (like a beta-blocker), heart-rate zones can mislead you; effort-based measures like the talk test or rate of perceived exertion are safer and more reliable. That's worth a conversation with a professional before you build a plan around numbers.
The takeaway
Training zones aren't complicated, but they're easy to get wrong, and the most common mistake is the most invisible one. Push your easy days too hard, hold your hard days back, and you spend all your effort in a grey zone that quietly limits you. Keep the two ends apart, respect the 80/20 ratio, and you give your body a clear signal for each adaptation. The research has been saying this for a decade. Your training should catch up.
Your body doesn't need every session to feel hard to be working. It needs the right sessions to feel hard, and the rest to feel easy.